8.28.2011

Beauty

This week at the market I was particularly struck by the beauty of everything that we had brought to sell. We have gotten into a routine of how we display our products and I felt very proud of my family. From the huge heads of cabbages to the green beans to the flowers, we grow everything and are able to provide a product that people really appreciate. It has been fun to see the regulars and I think we are finally establishing a customer base.

Endeavor Farm's market display

Ivory Egg Tomatoes, Onions, Green Beans, Heirloom Tomato Mix

It is hard to believe that September begins this week. It hit me when my hands were actually cold picking the basil on Saturday morning and a vendor brought pumpkins to market. The summer has gone by quickly and I feel like we accomplished a lot but are really just starting our endeavor to farm. I am already looking forward to next year so that we can make changes and try some new things. I think we will be even better prepared next year because we are all learning and have all of the bitter Cleveland winter to plan for the spring.

Flowers

Sedum, Zinnias, Ageratum

The season is far from over though and we still have lots of work ahead of us. We still have another crop of lettuce and spring mix to plant as the temperatures drop and we hope our second planting of broccoli doesn't disappoint. Lots more to come in the next few months!!
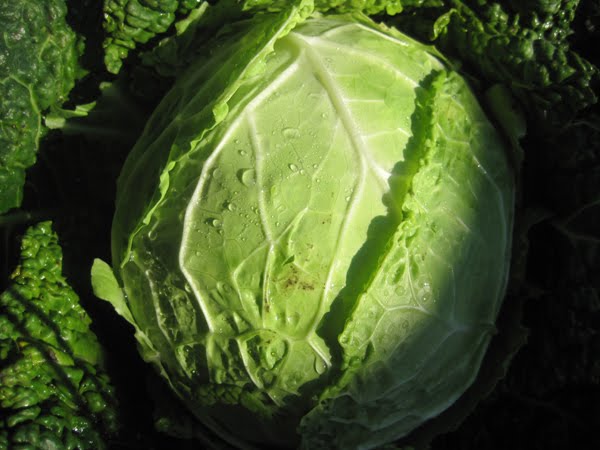
Savoy Cabbage

8.25.2011

Market + Recipe

This weekend, on Saturday, August 27, 2011 we will have:

-Garlic
-Kale
-Carrots
-Onions
-Cilantro
-Parsley
-Beans
-Basil
-Tomatoes
-Beets
-Flowers

This week I bring you yet another cold salad. I can't get enough of all of these fresh veggies and although the weather is cooling down, I still opt for dishes where I don't need the oven or stove. This recipe for Italian Bread Salad (Panzanella) from Cook's Illustrated calls for making croutons which does use the oven but you can make a lot of these ahead of time too and save them for the next meal.

4 servings

6 cups rustic Italian or French bread, cut or torn into 1" pieces (1/2 to 1 lb)
1/2 cup extra virgin olive oil
salt and pepper
1 1/2 lbs tomatoes, cored, seeded, and cut into 1" pieces
3 tbsp red wine vinegar
1 cucumber, peeled, halved lengthwise, seeded, and sliced thin
1 shallot, sliced thin
1/4 cup chopped fresh basil

1. Adjust oven rack to middle position and heat oven to 400 degrees. Toss bread pieces with 2 tbsp oil and 1/4 tsp salt; arrange bread in single layer on rimmed baking sheet. Toast bread pieces until just starting to turn light golden, 15-20 minutes, stirring halfway through. Set aside to cool to room temperature.
2. Gently toss tomatoes and 1/2 tsp salt in large bowl. Transfer to colander and set aside over bowl; set aside to drain for 15 minutes, tossing occasionally.
3. Whisk remaining 6 tbsp oil, vinegar, and 1/4 tsp pepper into reserved tomato juices. Add bread pieces, toss to coat, and let stand for 10 minutes, tossing occasionally.
4. Add tomatoes, cucumber, shallot, and basil to bowl with bread pieces and toss to coat. Season with salt and pepper to taste, and serve immediately.

These simple ingredients make for a delicious salad to go with almost any dinner!

8.22.2011

Preparing For Winter!

Many of you may say that summer just arrived, but it is never too early to start thinking about canning and pickling as much fresh produce as you can before the cold months hit. Sometimes it's hard to consume as much produce as you grow during the season and knowing how to preserve a lot of it makes all the hard work even more worth while. Some of my earliest and fondest memories are of making tomato sauce with my mom in the kitchen, despite the many steamy and sweaty August hours it required!

One of Bev's shelves of preserved food

This season between the Rieses and Petronis we have made currant jelly, raspberry jam, a variety of dill pickles, pickled peppers, tomato sauce, peaches in syrup, and salsa. Some of the past season's mason jars have contained pickled beets, fruit compote, pears, pickled green beans, pickled green tomatoes, sauerkraut, ketchup, and more. My favorite continues to be the pickled green beans and now it's impossible to have a sandwich without them!


Dill Pickles

If you've never pickled or canned anything it may sound intimidating. The whole process definitely takes practice and you might break a few jars in the hot water or fail to get a proper seal. Luckily there are great books out there that give you recipes and you can try them yourself. Two books we highly recommend are "The Joy of Pickling" and "Ball Complete Book of Home Preserving". The equipment is pretty simple too: a large canning pot, special tongs for getting the jars out of the hot water, lids, and jars. The 'pop' of the lid letting you know that your jar has properly sealed is one of the most wonderful sounds because you know you can safely store your work on the pantry shelf for the months to come.

Raspberry Jam

There are all types of recipes for pickles and they vary in the length of time it takes for them to brine. We made some delicious pickles that were ready in a week and some that require a 2 week fermentation before canning. Also, if you're itching to pickle after reading this but don't have the equipment, do not fear! We love to "quick pickle" and my favorite recipe makes pickled red onions. They turn a beautiful bright pink and work great on sandwiches or salads because they don't have the lingering bite of raw onions. Good luck!

Pickled Red Onions
1 red onion (sliced thin)
1/2 cup white vinegar
1/2 cup water
1 tsp sugar

Bring the white vinegar and water and sugar to a simmer and add onions. Let them simmer for about 5 minutes (or less if you like them crunchier) and then turn off the heat and leave covered. The longer you let them sit, the more they will pickle. I usually leave the lid on for about 30 minutes and then let them cool. You can store the onions in the brine in the refrigerator and even recycle the brine after you eat all of the onions. You can do any amount of onions-just use the same ratio for your brine to cover the onions.

Pickled Red Onions

8.17.2011

Market + Recipe

On Saturday, August 20, 2011, we will have the following:

-Garlic
-Onions
-Parsley
-Cilantro
-Basil
-Beans
-Kale
-Tomatoes
-Carrots
-Savoy Cabbage
-Beets
-Flowers

We love our salads in the Ries family and I am sharing with you another family favorite - Beet Salad. Even if you are not in love with beets, I highly recommend this recipe because it is simple and delicious and is a beautiful accompaniment to any summer dish. Be sure to use plenty of salt to contrast the sweetness of the beets! You can either roast or boil the beets to cook them but I always think they taste better roasted. In an effort to keep the house cooler, we've been boiling them a lot this summer which is a fine alternative.

At the market we often get asked how to cook beets so here you go:

Boil - You can either peel them before or after, cover with water and simmer on low heat until very tender with a fork.

Roast - Wrap in tinfoil in a small package and roast until tender at 400 degrees. It will take a different amount of time depending on the size, but once again, they should be tender with a fork. You can also put them in a small oven safe dish with a little bit of water to help them steam and cover with foil. The skins should come off very easily after they are roasted.

And now for the recipe...

4 servings

3 cups of cooked beets, peeled and sliced
1/4 cup chopped basil
1 clove garlic, finely minced
3 tbsp olive oil
2 tbsp white or red wine vinegar
salt + pepper to taste

Toss all together in a bowl and enjoy!

8.14.2011

Now and Then

Happy 40th anniversary to Bev & Terry today!

Bev & Terry's wedding announcement - 1971

A lot has changed in the past 40 years for them including the house and garden. I looked through some old photos today to try to show how much work they have put into the house that they moved into 2 years after they were married. We were lucky to never move as kids and are happy to still be able to visit the home that we grew up in. Luckily their taste has changed from red-orange carpet to wood floors in the livingroom, from yellow wallpaper to white walls, and from the red painted house to a grey-green. I will still always think of the red house as home but it was time for a change I suppose. The garden will forever be an evolving piece of land but I hope that it always stays an open lot, no matter who owns the land. Congratulations, mom and dad, on 40 years and many thanks for everything you have done for us!

August 14th, 1971

View of the garden from the driveway - 1978

Terry taking down the barn - 1978

View of the front of the house - late 1970's

8.11.2011

Market + Recipe

This week on Saturday, August 13, 2011, we will have:

-Garlic (Music, Leningrad, German Porcelain, Italian Purple Stripe)
-Green Beans
-Beets
-Carrots
-Cilantro
-Parsley
-Basil
-Savoy Cabbage
-Kale
-Eggplant
-Flowers

For this week's recipe I am going to share with you a green bean-tomato salad. We eat this in our family a few times a week because it is so delicious and uses everything from the garden! The ratio of green beans to tomatoes can be whatever you prefer depending on your taste.

Green Bean-Tomato Salad

Servings: 4

4 cups of green beans and chopped tomatoes (total)
1 large clove of garlic
1/4 red onion, chopped
5-7 large basil leaves, minced
3 tbsp olive oil
2 tbsp red wine vinegar
salt & pepper to taste
feta (optional)

Blanche the green beans and rinse under cold water and pat dry. Add to large chunks of tomato in a bowl. Add garlic, basil, and feta (optional). I prefer to mix the vinaigrette in the bowl so add olive oil, vinegar, and s & p at once and toss well. Nothing is better than this fresh salad!!

8.09.2011

Ada Jane Petroni

We have a new addition to the family and little Ada Jane has been occupying most of our thoughts and time this past week. Hannah and Ian are already fabulous parents and Hannah did beautifully during labor. Ada (named after Ian's aunt who recently passed away) was born on August 2nd at 4:55 pm at 20.75 inches long and 8lbs, 13.6 oz. She is wonderful and we all love her so much and can't get enough of her. When we met her at the hospital, one of Grandpa Terry's first comments was "I can't wait to get her weeding in the garden!". I think he'll have to wait a bit but I am sure she will be visiting Endeavor Farm soon. There are already so many cute pictures of her but here are a few! Congratulations again to Hannah & Ian!!


8.04.2011

Market + Recipe

On Saturday, August 6, 2011, we will have:

-Music Garlic
-Leningrad Garlic
-German Porcelain Garlic
-Italian Purple Stripe Garlic
-Green Beans
-Beets
-Carrots
-Cilantro
-Parsley
-Basil
-Savoy Cabbage
-Kale
-Flowers

I am still pushing for you to be eating lots and lots of basil because we have SO much of it and it is delicious. I have been making lots of pesto every week and putting it in the freezer so that I can have a taste of summer in the middle of winter. I have also been putting a bit of pesto in some mayonnaise to make a basil mayonnaise and it is so refreshing on sandwiches, grilled veggies, burgers, you name it! If you make a lot of pesto and want to freeze it, put some in a jar (enough for about 2 - 4 servings) and put enough olive oil in the jar on top of the compacted pesto to cover. This will keep it from browning. This week you can get Endeavor Farm basil and garlic and be pretty much set for your pesto!

1/2 cup pine nuts (optional, or substitute almonds)
3/4 cup olive oil
4 ounces of basil, stemmed (about 5 cups of leaves)
2-3 garlic cloves, coarsely chopped
1/2 tsp salt, or to taste

Heat a small skillet over medium heat and add pine nuts. Toast them, shaking pan, and stirring, until golden brown all over, about 3 minutes. Put pine nuts on a plate to cool.

Combine all ingredients in a food processor or blender until smooth. Use immediately or store in fridge for a week, or put in the freezer.

8.02.2011

Keeping Up

Is it really August already?! The summer is flying by and we are still working hard in the garden. There is a lot of work that goes into the farm on a daily basis besides weeding and watering. I thought I'd share a few things that we do on a regularly to keep things moving along!

Winter Rye: We seeded winter rye where our garlic crop was. This is a cover crop which means that we will let it grow so that it completely covers the area. Winter rye is a maintenance free way to put nutrients back into the soil. We will till it under before we plant our next fall crop and next year we will move our garlic elsewhere in the garden to keep up the rotation of crops.

Winter Rye

Deadheading Basil: A lot of people grow basil in pots or in their backyard and something that is very easy to do that will greatly encourage growth is to snip off the flowers regularly. This will put the energy of the plant into the leaves and not into the flowers and also keep the plants from getting too leggy.

Basil

Bolting Lettuce: Sometimes there just isn't enough time in the day to get everything done. You can see here our spring mix that did so wonderfully earlier this summer has bolted and we haven't had time to till it under. It is very bitter by now and too hot for lettuce to be growing. We plan on tilling it soon and hopefully planting another crop of it later in the summer when it cools down.

Bolted Spring Mix

Beetles: These guys have always been a problem for us in the garden. The only thing we have ever found to work as a solution (without spraying) is to hand pick them off of the plants and put them in mild soapy water. Japanese beetles are all over the zinnias and rhubarb and flea beetles have taken a liking to our eggplant and although the leaves have holes in them, the fruit looks great!

Eggplant

Japanese Beetles

Tying Up Tomatoes: This is another thing that lots of people have their own systems for in their backyards. It is always hard to remember how big tomato plants get when you start with little seedlings in the early summer but it is important to stake them early and keep them maintained. I worked on a farm in Massachusetts last year and we found these tomato clips to be very helpful. You just run lengths of twine or string from the top of the stake and clip the tomato plant in several places along the string to keep the plant off the ground. They are cheap and can be used year after year. We try to tie up the tomatoes once a week or so to limit the amount of breakage on the plants and to keep tomatoes off the ground where they will rot.

Tomatoes